| Navigation: Clarion.Net (Clarion#) > Clarion# Language Extensions > Clarion.NET FAQs > Compact Forms >====== Compact Forms Quick Start ====== |    |
To get started with building and deploying a Compact Framework application in Clarion.NET, there are two setup categories which must be followed; machine setup, and verification of connectivity to the target device and test emulator.
Machine Setup
In order to properly configure and test your Compact Forms application, the following components need to be installed on your development machine:
.NET Framework 2.0 SDK
.NET Compact Framework version 2 service pack 2
ActiveSync 4.5 (for XP), or Windows Mobile Device Center 6.1 (for Vista)
Device Emulator v3.0
Mobile Device SDKs
Step 1
First, install the .NET Framework 2.0 SDK.
Step 2
Next, install the .NET Compact Framework version 2. At press time, Service Pack 2 was the latest version.
Step 3
Install ActiveSync 4.5 ( for XP ) or Windows Mobile Device Center 6.1 (WMDC) (for Vista)
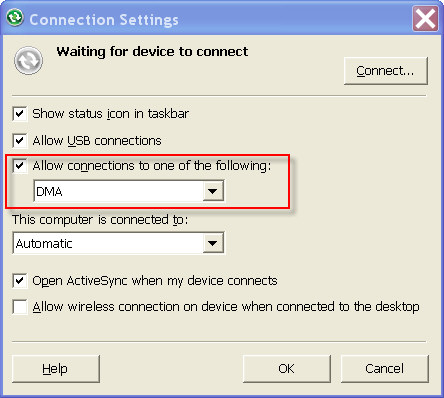
It is important to install ActiveSync or WMDC before installing the Emulator that follows, otherwise you will not see the “DMA” option in the dropdown list shown below.
Step 4
Download and Install the Device Emulator 3.0
Step 5
Windows Mobile SDK Installer
There is a special setup program to assist you with configuring your system for the development of Pocket PC 2003 and Windows Mobile Device applications. The program is named wmSDKInstaller.
The install creates a shortcut in the Clarion.NET Programs Menu; “Windows Mobile SDK Install Tool”. This program can install any of the Compact Framework SDKs without requiring you have Visual Studio on your machine.
After downloading any of the Compact Framework SDKs run this program and let it install the SDK for you.
Click on the shortcut to run the install.
The Help button provides additional details on using the installer. Make sure that each Mobile SDK install is installed in its own unique destination folder (Path to Clarion folder).
Here are links to other important Mobile SDKs:
Windows Mobile 5.0 Pocket PC SDK
Windows Mobile 6 Standard SDK Refresh
Windows Mobile 6 Professional SDK Refresh
Note: Click here if the SDK Installer is having problems finding the CoreCon Libraries.
We recommend that all of the above also be installed, and that you uninstall any prior install before applying the new install.
Step 6
After installing all of the above, set a connection from ActiveSync or WMDC to the Device Emulator via DMA in the ActiveSync settings
To do this, start ActiveSync or WMDC. From the main menu select File→Connection Settings, and set it as shown here:
Verification of Connectivity
Open the following folder:
| \Clarion.Net\bin\Addins\BackendBindings\ClarionBinding\ClarionNet\CFFormsDesigner\Data |
In this folder locate and then double-click on {52ADC494-264B-42a4-AEEA-32049B5265A4}.dess to start the Device Emulator.
Next, open the \Program Files\Microsoft Device Emulator\1.0\ folder and run dvcemumanager.exe.
The Device Emulator Manager runs, displaying an icon indicating that Pocket PC 2003 SE Emulator is launched. Select it, right-click and choose Cradle from the pop up menu.
At that point an ActiveSync or WMDC icon in the taskbar should become green and start rolling, and a dialog opens asking to set up a partnership with the device. Choose Guest partnership and press Next. ActiveSync should show a dialog displaying Connected.
If the last step does not occur. please open the ActiveSync or WMDC Connection Settings and access the Connect' dialog.
In the Get Connected dialog press Next. COM ports checking starts. Here you can just press Cancel. ActiveSync should then start connecting to the emulator.
After verifying those steps close the Device Emulator and then try the following steps;
Deploying a Compact Framework Program from the IDE:
Open a Compact Framework project.
Press the Starts without debugger (Builds Solution) button.
The Deploy dialog appears with the list of available devices. You can choose an emulator at this time, or deploy directly to a device.
If you choose an emulator, select the appropriate type, and press the Deploy button. The device emulator is launched and a message box with '“Please wait until the OS image is deployed to the device emulator” appears. Initially the device emulator's window is black while the OS image is being loaded onto the emulator. Typically it takes about 20-30 seconds and then the emulator's window will change to blue with the “Windows Mobile” welcome text, but the OS image is still being loaded. The process of loading the OS is finished when you see the Start button. Only after that you can press OK on the message box with “Please wait until the OS image is deployed to the device emulator”.
Press OK. The device emulator is cradled. A Connection is set via ActiveSync or WMDC. Deploying of your program files is then started.
Finally, press the Deploy button. At that time the device emulator is loaded and the connection is set. The process of the application files deploying starts. In about 10-20 seconds the application is launched.
When deploying to an emulator, it's a good idea to create a DESS to speed up deployment and testing.
See also: Creating a DESS File.


