| Navigation: User's Guide and Tutorials > Guided Tour of Working in Clarion >====== 10 - Control and Extension Templates ====== |    |
For the BrowseOrders procedure, you'll create a window with two synchronized scrolling list boxes. One will display the contents of the Orders table, and the other will display the related rows in the Detail table. You'll use a generic Window procedure, and populate it using Control templates. The only reason for doing it this way instead of starting with a Browse Procedure Template is to demonstrate another way of building a procedure'using Control templates placed in a generic Window (the same way the Browse Procedure template itself was created).
Control templates generate all the source code for creating and maintaining a single control or related group of controls. In this case, placing a BrowseBox Control template allows the Application Generator to produce the code that opens the tables and puts the necessary data into the structures which hold the data for display in the list box.
Starting Point:
The LCLESSON.APP file and Application Editor (tree) should be open.
Creating the Procedure
Select the procedure type
1.Highlight BrowseOrders then press the Properties button.
2.In the Select Procedure Type dialog, select the Template tab, choose Window ' Generic Window Handler, then press the Select button.
Edit the Window
1.In the Procedure Properties dialog, press the Window tab.
2.In the Window Designer Editor, press the Designer button.
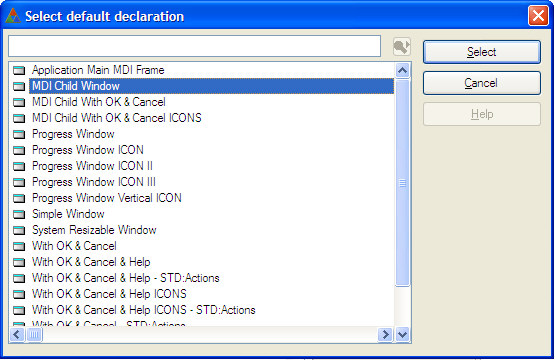
The Select default declaration dialog appears. The generic window procedure is like a blank slate in which you define your own window. Since the procedure has no predefined window, you choose the type of window for your starting point. In this case, you need an MDI child window.
3.Highlight MDI Child Window, then press the Select button.
The Window Designer appears.
4.Resize the window, making it more than twice its original size (in both directions).
5.CLICK in the window's title bar, then open the Properties Pad if not already opened.
6.In the Properties Pad, type Orders in the Title property .
7.Verify that the FrameType property is set to Resizable.
8.Set the MaximizeBox property to TRUE.
Placing the BrowseBox Control Template
1.Verify that the Control Templates Pad is now opened.
2.Highlight the BrowseBox Control template, then DRAG near the upper left corner of the sample window and DROP.
Place the Orders table columns in the List Box Formatter
1.Highlight the <;ToDo> item below the File-Browsing List Box and press the Add button.
2.Highlight the Orders table in the Select dialog, then press the Select button.
3.Highlight the Orders table, press the Change button and select KeyOrderNumber from the Change Access Key dialog.
4.Highlight CustNumber in the Columns list, then press the Select button.
5.RIGHT-CLICK on the Browse box just populated, and select List Box format' from the popup menu.
7.Highlight OrderNumber in the Columns list, then press the Select button.
8.Press the Add Field button.
9.Highlight InvoiceAmount in the Columns list, then press the Select button.
10.Press the Add Field button.
11.Highlight OrderDate in the Columns list, then press the Select button.
12.Press the Add Field button.
13.Highlight OrderNote in the Columns list, then press the Select button.
14.Resize the columns if needed by adjusting the column's Width property.
15.CTRL+CLICK to multi select the first four columns, and set the Resizable and RightBorder properties to TRUE.
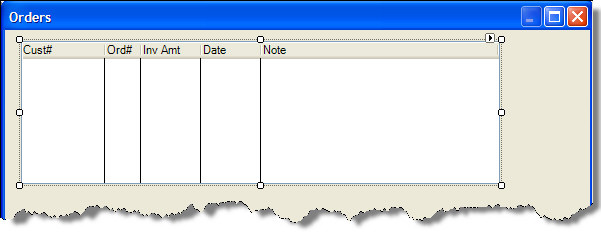
16.Finally, examine the Header text property of each column, and modify as follows:
Cust#
Ord#
Inv Amt
Date
Note
17.Press the OK button to close the List Box Formatter.
18.Resize the browse list box control to make it wider by dragging the handle in the middle of the right side (almost as wide as the window).
Format the list box appearance
1.RIGHT-CLICK the list box, and select Properties from the popup menu.
2.Set the Vertical and Horizontal properties to TRUE.
This adds vertical and horizontal scroll bars to the list.
3.Press the ellipsis button located just to the right of the TextFont property.
Because one column (the description column) is long, you can specify that the list box should use a smaller font, displaying more information without requiring the end user to scroll.
4.Choose a font (your choice), and set the size to 8 points.
In general, you want to stick with the fonts that ship with Windows; otherwise, you can't be sure your end user has the same font on their system. Our example sets the font to Arial, which is a font that ships with Windows.
5.Press OK to close the Select Font dialog.
Adding the Browse Update Buttons Template
Next add the standard Insert, Change and Delete buttons for the top browse list box control. Since there are going to be two list boxes on this window, we'll leave these buttons visible for the user. Later we'll add a form procedure for adding or editing an order.
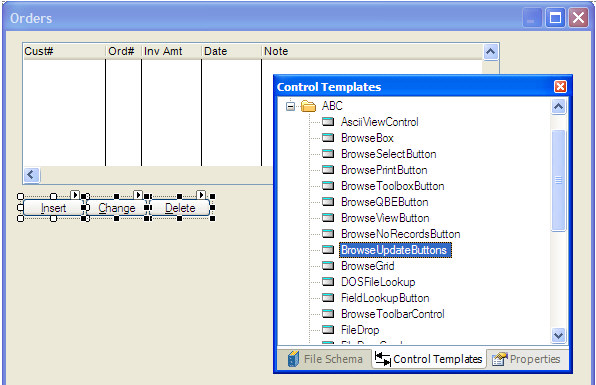
1.In the Control Templates pad, highlight the BrowseUpdateButtons control template, then DRAG below the left edge of the list box.
The Insert, Change, and Delete buttons all appear together.
Name the Update Procedure
1.RIGHT-CLICK on the Delete button only, then choose Actions from the popup menu.
2.Type UpdateOrder in the Update Procedure box.
This names the procedure, in the same way that you named the Update procedure for the Customer browse in its Procedure Properties dialog.
Naming the Update Procedure for one button in the Control template names it for all three.
3.Press the OK button.
Placing the Second Browse List Box
Next, place a list box with the contents of the Detail table. This will update automatically when the end user changes the selection in the top list box.
1.In the Control Templates Pad, highlight the BrowseBox Control template, then DRAG directly below the Insert button you placed before, and DROP.
The second Browse Box control is now populated.
Place the Detail table columns in the List Box Formatter
1.In the Data / Tables Pad, highlight the <;ToDo> item below the second File-Browsing List Box and press the Add button.
2.Highlight the Detail table in the Select dialog, then press the Select button.
3.Highlight the Detail table, and press the Change button.
4.Highlight OrderNumberKey in the Change Access Key dialog, then press the Select button.
5.RIGHT-CLICK on the Browse box just populated, and select List Box format' from the popup menu.
6.Press the Add Field button.
7.Highlight OrderNumber in the Columns list, then press the Select button.
8.Highlight the “dummy” field just above the OrderNumber column just added, and press the Remove button to remove it.
9.Press the Add Field button.
10.Highlight ProdNumber in the Columns list, then press the Select button.
11.Press the Add Field button.
12.Highlight Quantity in the Columns list, then press the Select button.
13.Press the Add Field button.
14.Highlight ProdAmount in the Columns list, then press the Select button.
15.As you did in the first Browse Box, adjust the column Width property as needed, set the Resizable and RightBorder property to TRUE as before, and adjust the Header Text as needed.
16.Press the OK button to close the List Box Formatter.
17.Resize the browse list box control by dragging the handles, making it an appropriate size for display (but leave some space to its right for a button we're going to place in the bottom right corner of the window).
Set up the Range Limits
1.RIGHT-CLICK on the list box you just placed and select Actions from the popup menu.
2.Press the ellipsis ( … ) button for the Range Limit Field.
3.Highlight the DTL:OrderNumber column in the Components list, then press the Select button. (Note: this column may populate automatically)
4.Choose File Relationship from the Range Limit Type drop list.
5.Press the ellipsis ( … ) button in the Related File entry.
6.Highlight the Orders table in the Select Table from Procedure Schema list, then press the Select button.
These last four steps limit the range of rows displayed in the second list box to only those Detail rows related to the currently highlighted row in the Orders table's list box.
This tells the second control template to use the table relationship defined in the data dictionary to synchronize the bottom list to the top.
7.Press OK to close the Actions(Prompts) dialog.
Format the list box appearance
1.Make sure the second Browse Box is selected, and refer to the Properties Pad.
2.Set the Vertical and Horizontal properties to TRUE.
This adds horizontal and vertical scroll bars to the list box.
3.Press the ellipsis button to the right of the TextFont property.
Although there are no “long” columns in this list box, it will look better if you match the font to the same font used in the top list box.
4.Choose a font (your choice), and set the size to 8 points.
5.Press OK to close the Select Font dialog.
Adding the Close Button Control Template
Finally, you can add a Close button that closes the window.
1.Open the Control Templates Pad, if not already displayed.
2.Select the CloseButton Control template, then DRAG to the lower right corner of the window.
3.Press the Save and Close button on the Window Designer toolbar to close the Window Designer, and automatically save changes.
Make the window resizable
1.In the Procedure Properties dialog, select the Extensions tab.
2.In the Extensions and Control Templates dialog, press the Insert button.
3.Highlight WindowResize in the Select Extension dialog, then press the Select button.
We've used this Extension template several times already, but this time we'll modify its actions instead of simply taking the default behavior.
Specify the resize strategies
1.Check the Restrict Minimum Window Size box.
By checking this box and leaving the Minimum Width and Minimum Height set to zero (0), this template ensures that users cannot make the window any smaller than the designed size of the window.
2.Press the Override Control Strategies button.
The Override Control Strategies dialog appears. This dialog allows you to specify the resize strategy for individual controls.
3.Press the Insert button.
4.Select ?Insert from the Window Control drop list.
5.Choose the Fix Bottom radio button in the Vertical Positional Strategy set of options.
This sets the resize strategy for the Insert button to keep it a fixed distance from the bottom of the window. Now we'll do the same for the other two update buttons and the Details list box.
6.Press the OK button.
7.Press the Insert button, then select ?Change from the Window Control drop-down list.
8.Choose the Fix Bottom radio button in the Vertical Positional Strategy set of options, then press the OK button.
9.Press the Insert button, then select ?Delete from the Window Control drop-down list.
10.Choose the Fix Bottom radio button in the Vertical Positional Strategy set of options, then press the OK button.
11.Press the Insert button, then select ?List:2 from the Window Control drop list.
12.Choose the Fix Bottom radio button in the Vertical Positional Strategy set of options, then press the OK button.
13.Press the Insert button, then select ?List from the Window Control drop list.
14.Choose the Constant Bottom Border radio button in the Vertical Resize Strategy set of options.
This sets the resize strategy for the Orders List box to keep the bottom border of the list a fixed distance from the bottom of the window. Therefore, the list will stretch as needed to fill up the space as the window becomes larger.
15.Press the OK button to close the Override dialog, and then press the next OK button to close the Window Resize dialog.
Set up a Reset Column
1.In the Extensions and Control Templates dialog, highlight Browse on Detail and press the Properties button.
2.Press the Reset Fields button, then press the Insert button.
3.Type ORD:InvoiceAmount in the Reset Column entry (or press the ellipsis and select it from the select colukn list) , and then press the OK button.
This specifies that the Detail table's list box should reset itself whenever the value in the ORD:InvoiceAmount column changes. This ensures that any changes you make to an existing order are reflected in this dialog when you return from changing the order.
4.Press the OK button to close the Reset Fields dialog, and then press the OK button to return to the Procedure Properties dialog.
Close the Procedure Properties dialog and Save the Application
1.Press the Save and Close button  in the Procedure Properties dialog to close it.
2.Choose File  Save, or press the Save button
  on the tool bar to save your work.
OK, What Did I Just Do?
Here's a quick recap of what you just accomplished:
Next we'll create the UpdateOrder Form procedure to create and maintain the Orders and Detail table rows.


