| Navigation: User's Guide and Tutorials > Getting Started with Clarion! >====== Exercise Three - Relate Your Tables ====== |    |
Obviously, we want the Orders table to contain the pertinent information of the Customer. This means there must be a relationship between the two tables. In this case, one Customer can have many Orders, making this a “One to Many” relationship. To define this relationship, we must link the tables together in the data dictionary to provide the Application Generator with the information necessary to access the related records.
If you first need to review the basics of database design, click here, and when ready, continue through this exercise.
Set the Relationship for the two tables:
1.Examine the Main Dictionary window. You should notice in the bottom right corner the Relations List. Highlight Customer in the DCT Explorer list box, then press the Add Relation button  located directly above the Relation list box. This button is the only button enabled on the relation pane (right hand side).
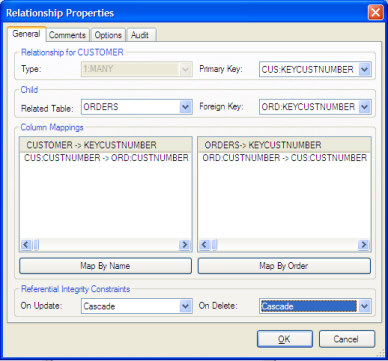
The Relationship Properties dialog appears. This is where you define the relationship.
2.Make sure the Type drop list is set to 1:MANY.
3.In the Primary Key drop list, press the down-arrow key to display the choices, highlight KeyCustNumber, and then press the TAB key.
This is the key on the Customer table (the One side of the relationship) that will be used to link the two tables.
4.In the Related Table drop list, press the down-arrow to display the choices, highlight Orders, and then press the TAB key.
5.In the Foreign Key drop list, press the down-arrow to display the choices, highlight KeyCustNumber, then press tab.
This is the key on the Orders table (the Many side of the relationship) that will be used to link the two tables.
Next, the linking columns in the keys must be “mapped” so the Application Generator can know exactly which columns in the two tables are related to each other. Since we used identical column names, this is easy.
6.Press the Map By Name button.
The linking columns between the two tables appear in the two Column Mapping list boxes. This is one reason to name linking columns the same.
Set Up the Referential Integrity Constraints
1.In the Referential Integrity Constraints group box, choose Cascade from the On Update dropdown list.
2.In the Referential Integrity Constraints group box, choose Restrict from the On Delete dropdown list.
The generated source code will automatically maintain referential integrity between the tables.
3.Press OK to close the Relationship Properties dialog.
4.Another Relationship Properties dialog appears, allowing you to add a second relationship. Press the Cancel button to close this window.
In the next lesson, let's create a new dictionary file from scratch, and examine the Dictionary Editor in more detail.


