| Navigation: User's Guide and Tutorials > Getting Started with Clarion! >====== Exercise Eight - Generate your Program using the Wizards ====== |    |
Now it is time to unleash a very powerful part of Clarion and the IDE: The Application Wizard.
In this exercise, we will use the dictionary that we created in Exercises 1 ' 7, and generate a full-featured application, all in just a few minutes with no hand coding needed!
Make sure that the Clarion IDE is loaded. Close any windows that may be opened at this time. You can leave this help file opened, and task switch back and forth with the IDE windows. In this lesson, the install folder is identified as Clarion7. If you decided to install to a different root name, please substitute accordingly.
The Application Wizard generates entire applications based on the minimal information that you provide in response to a series of Wizard dialogs that ask for one piece of information at a time.
Create a New Application
1.From the IDE Menu, choose File  New
New  Solution, Project or Application.
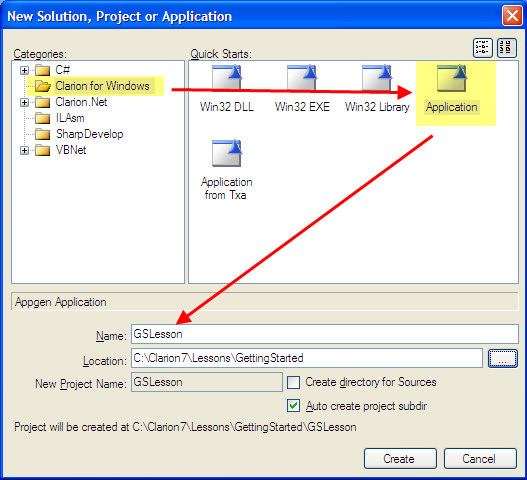
The New Solution, Project or Application dialog appears.
2.Select the Clarion for Windows item in the left Categories pane, and navigate to the Application Quick Start as shown above.
3.Verify that the Location is in the target '\Lessons\GettingStarted directory.
4.Type GSLesson in the Name field.
5.Uncheck the Auto create project subdir checkbox.
6.Press the Create button.
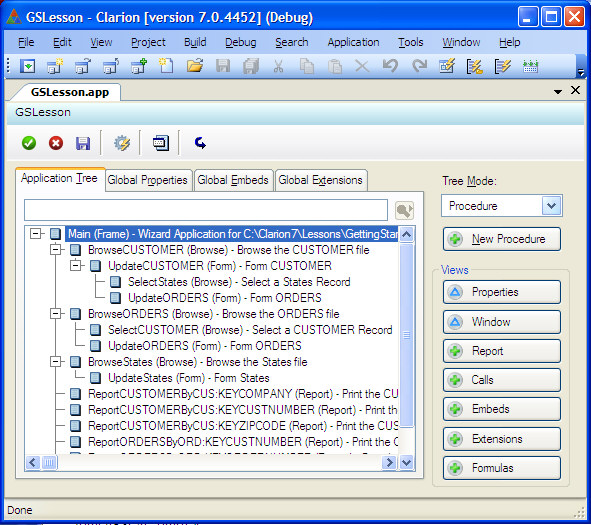
The Application Properties dialog appears.
7.Press the ellipsis ( … ) button to the right of the Dictionary File entry box.
The Select Dictionary dialog appears.
8.Highlight the '\Lessons\GettingStarted\GSLesson.DCT file and press the Open button.
9.Verify that the Application Wizard check box is checked, and then press the OK button.
The Application Wizard dialog appears.
10.On the opening wizard window, press the Next button.
11.Accept the Default Theme and Layout1 Report Layout, and press the Next button.
12.Make sure that the Generate Procedures for all files in my dictionary drop list choice is selected, and press the Next button four (4) times.
13.You should now be in the Procedures & Reports dialog window. Make sure that the Generate Reports for each file checkbox is checked.
14.Press the Finish button. The Application Wizard now creates the application.
15.From the IDE Toolbar, Generate Source, and Build and Run your application by pressing the Start without Debugger button (shown below):
Congratulations! Your complete application is now running.
Explore this new application. Try viewing and running reports on the default data that is supplied.
In the running application, we don't need to add or modify and data at this time, but just want to see the part of the application that our changes affected.
In the Customer's update form, entering an invalid state that does not exist in the States file will cause a pick list to pop up when the user moves away from the field.
16.Exit the GSLesson program, which returns you to the Clarion IDE. In the Application toolbar, press the Save and Close button to close the application, and then press the Close Solution button to close the application's solution.


